Data Migration Function – Arlyn UpScale
INTRODUCTION
This manual will outline how to perform data migration from one scale to another. You can also perform migrate your part database from your PC to the scale.
The Arlyn UpScale indicator is a versatile scale display indicator that not only offers the most advanced, state-of-the-art Scale Display Technology in the industry, but it also offers a myriad of functions and usability to allow the most flexibility in system integration. One of the newest features added in the Arlyn UpScale indicator is the ability to import Sample (used for Parts Counting), Tare and Setpoint records from the customers’ existing database. The scale also provides the ability to export its current table of parts or tares so that it can be used in the customer’s data or just for backup purposes in case something happens to the scale.
The Import/Export function is available in all Arlyn UpScale indicators equipped with USB Data Logging option.
DATA MIGRATION (IMPORT/EXPORT) DEFINITONS
The migration is performed through the process of exporting the data from your PC (or source scale) and importing it to the destination scale. If you have a separate database of tares or parts (for Parts Counting) that can be exported out an Excel Spreadsheet or CSV file, the Arlyn UpScale indicator (equipped with USB Data Logger function) can import those records instead of manually entering them on the scale screen. This way, hundreds of definitions can be entered into the scale’s fully editable and searchable database instantly.
PRE-REQUISITES FOR MIGRATION
Before performing the migration function, the following prerequisites must be met.
-
-
- It is imperative to know if your parts or tare database is exportable into an Excel or CSV format. This is required to merge your CSV file to the scale’s CSV file before import.
- The CSV file to be imported into the scale has a rigid format. Your exported CSV file must match the fields of the scale’s CSV file for the import to work. There are many third-party tools available for mapping and merging CSV/Excel files. Some of them are https://www.ablebits.com/excel-lookup-tables/howto-merge-data.php and https://www.office-addins.com/-excel-addins/lookup-assistant.php.
- It is the customer’s responsibility to match the format of their CSV files they wish to import to be compatible with the import requirements of the Arlyn UpScale, either through the add-ons mentioned above or some other means. Arlyn is not responsible nor liable on the reliability or the functionality of the software mentioned above.
-
DATA MIGRATION PROCEDURE
The following steps describe how to successfully perform data migration of your tares or parts table into the Arlyn UpScale indicator. These steps will use the Samples table (available with Parts Counting scales) to demonstrate data migration feature of the indicator.
Exporting Data
a) Firstly, it is easier to start with exporting the current sample (or tare table) from the indicator. It is also strongly recommended to export the current table from the indicator before doing an import. This will “backup” the current table on the indicator in case anything goes wrong during the import process.
b) Insert a suitable USB stick into the USB Data Logging port. It is recommended to use the factory provided USB stick as it has been formatted to be recognized by your scale as well as your PC.
c) Navigate to the table you want to export and touch the “Import/Export” icon at the top-right corner of the table.

d) This will bring up the “Data Table Import/Export” Dialog.
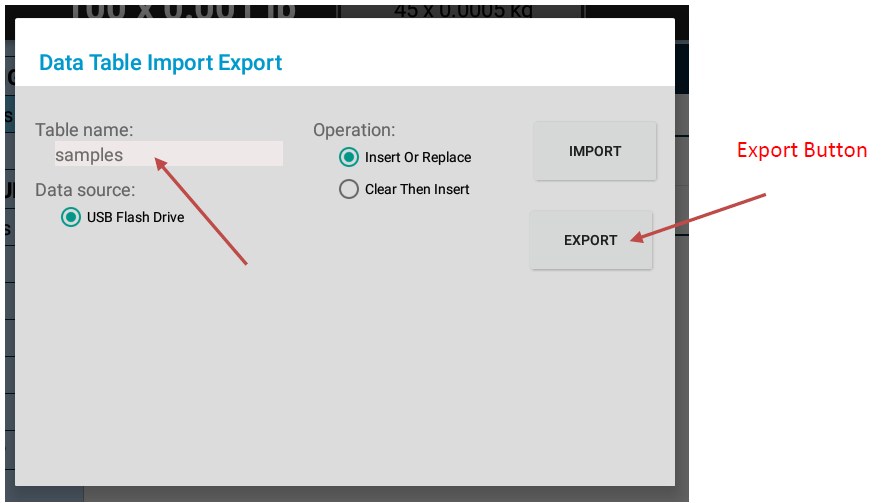
The Dialog will indicate which table is about to be exported under the “Table Name” field. Since we are demonstrating exporting Sample Definitions, the Table Name field is showing “samples”. If the Tare Definitions are being exported, the Table Name Field will show “tares”. Press the “EXPORT” button to export the current table into the USB stick.
e) Wait for the operation to complete – you will notice the “Export Successful” notification appear on the screen.
f) Pull the USB stick out and plug it into your PC. The illustration below uses a Windows PC to demonstrate file locations and other items.

Copy the “samples.csv” file out to a safe location in your PC as backup. You can also rename this file to “samples-org.csv” or any other suitable name so that it doesn’t get overwritten on the next export process. Note: If you have exported the Tares table, then you will see the “tares.csv” file.
Mapping Fields
g) Open the “samples.csv” to view it.
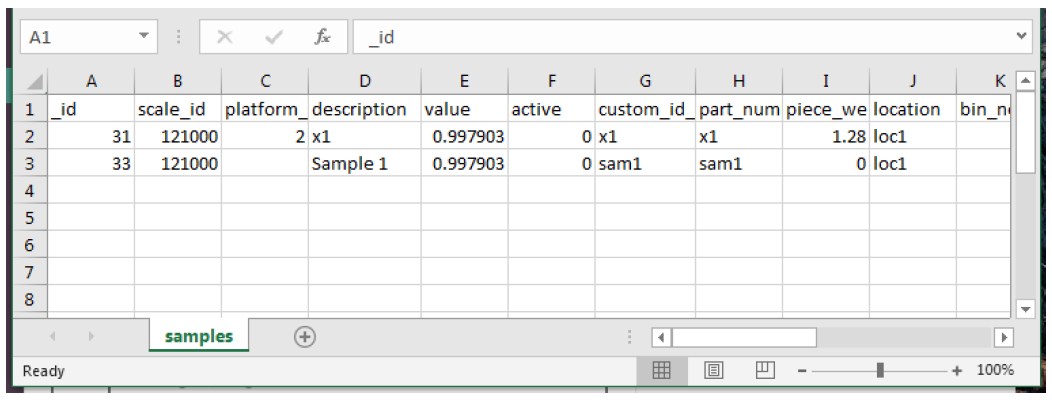
Basically, the CSV file is a snapshot of the scale’s database table. The essential fields to note here are the “description” column, the “value” field and the “custom_id” field. The rest are not essential. Even the “_id” field can be left blank for the scale to populate.
h) Use this “samples.csv” file to map the columns in your custom database export. This can be done with the help of the tools mentioned in the Prerequisites Section, or by other means.
i) Below is an example of a mapped “samples.csv” file with new parts added but using the same column names and order of columns.
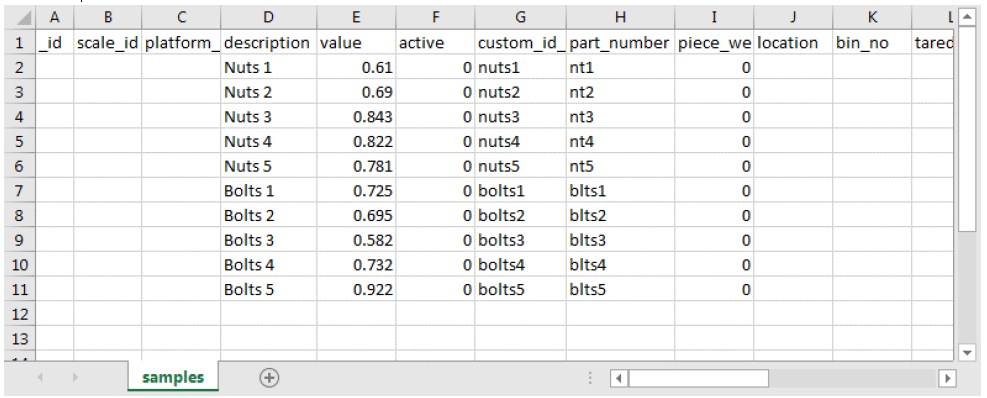
Notice that only the “description”, “value”, “custom_id” and “part_number” fields have been populated. The “part_number” field is optional but it has been filled regardless. The rest of the fields have been kept blank. However, they maybe filled if required.
Notes:
The value is always in “grams”. If you have data in any other unit, it must be converted to “grams” when stored in the CSV file to be imported.
It is important to keep the “_id”, the “scale_id” and the “platform_id” fields blank when adding new parts. This will be filled by the scale.
It is important that the order of the fields and the field names remain unchanged. Save the “samples.csv” file into the USB stick.
It is important that if your export function includes “_id”, then these values should not be repeated or overlapped. Otherwise
Importing Data
j) Plug the USB stick with the new “samples.csv” file back into the scale and touch the “Import/Export” button again on the top right corner of the table. This will open the “Data Table Import/Export” Dialog.
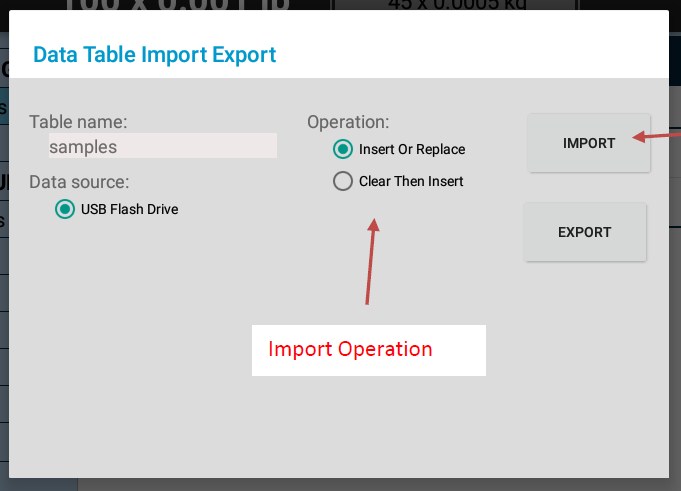
k) There are two types of Migration Import Operation:
a. Insert or Replace – This operation will insert the records from the CSV file into the scale data table without affecting previous records. It will also attempt to replace (i.e. update) the existing records with modified data on the same “_id”.
For example, in item (g) above, if you decide to rename the description for ID = 31 from “x1” to “fort2”, then the import function will replace those fields with the updated records without inserting an entire new record.
b. Clear Then Insert – This operation will clear all the data on the existing table in the scale before importing new records. This is recommended to do if you are importing the new data for the first time. This operation can also be used to update the data in the scale, but the existing table must be backed up, updated and then re-imported with new data.
Selecting this function will produce a warning on the dialog:
“DATA LOSS WARNING: This function will clear the scale’s data table first and then import the data from the USB stick. If the import fails, the previously cleared data will be permanently lost. It is strongly recommended to backup the current table by doing an EXPORT in a separate file in your USB stick, then use the Import function. If the data import fails, you can easily restore your previous data by importing the original file.”
l) For this operation, we will select “Clear Then Insert”. Pressing the Import Button will now import all the data in the table. Wait for a few moments until the “Import Successful” message appears. If there are errors during the “Import” process, it will appear in red on the dialog.
m) Go back to the data table and verify that all the parts have been imported successfully.
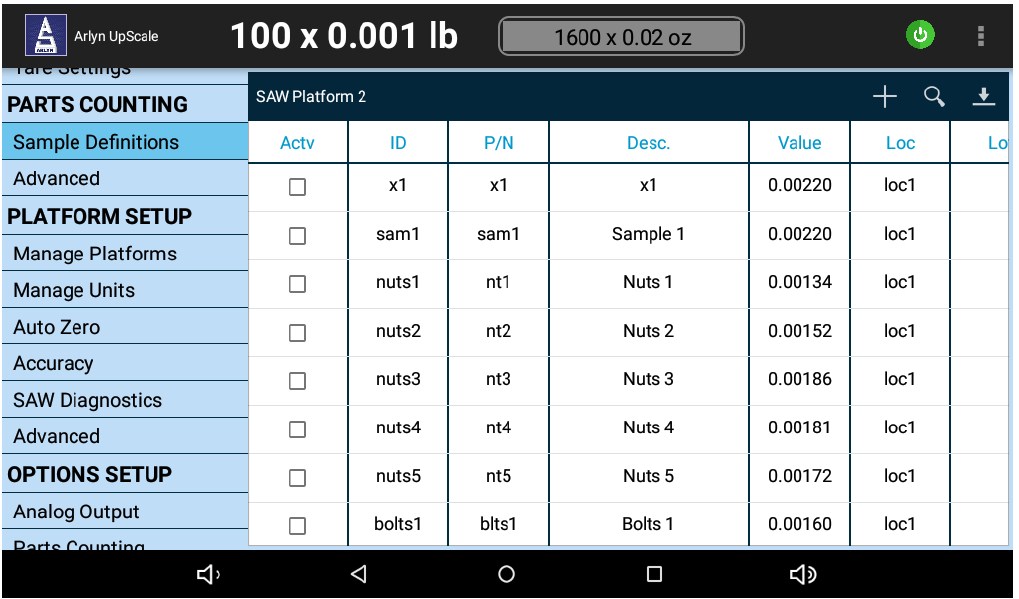
Since we picked “Insert or Replace”, the previous records are still there while new ones have been added from our new CSV file. The unit of the value will reflect what the current active unit is on the main weight screen.
n) This completes the migration import operation.
