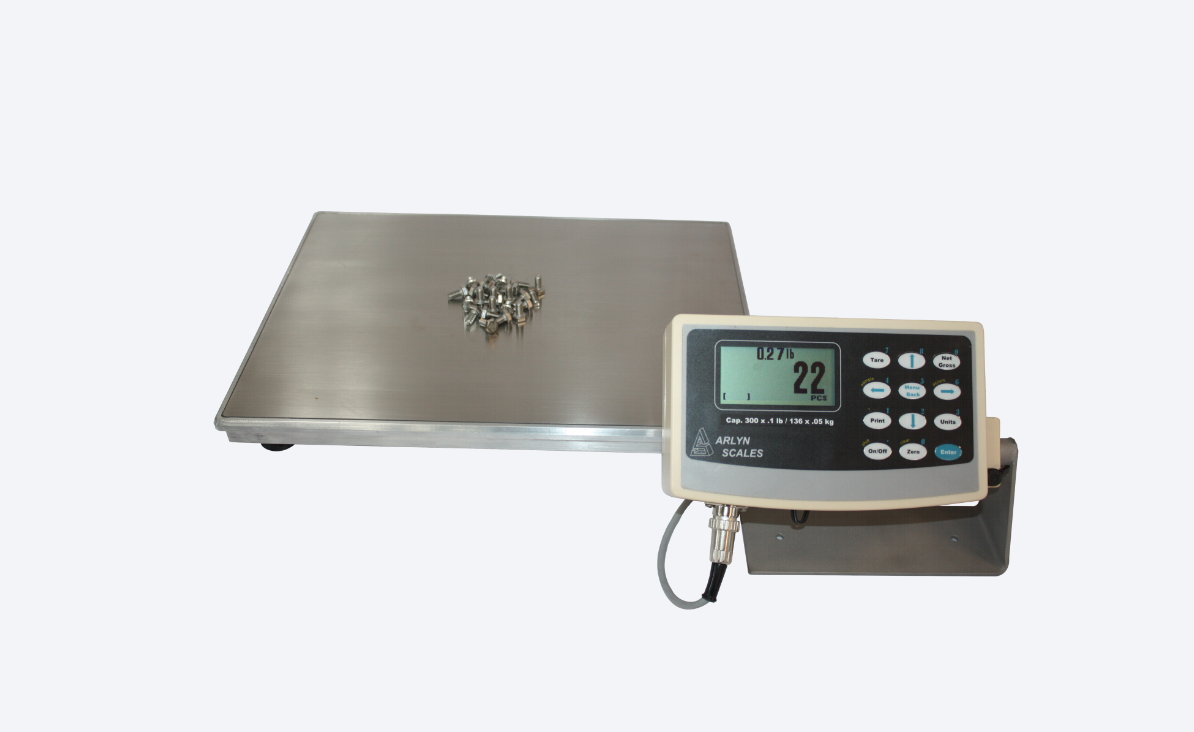
Arlyn MKE-5 Digital Indicator – Series 8200 – Parts Counting Manual
INTRODUCTION
Thank you for choosing an Arlyn Scale for your parts counting needs. The Arlyn MKE-5 Digital Indicator – Series 8200 – Parts Counting Manual is meant as a supplement to the regular instruction manual.
If this is your first time using parts counting with this scale, we suggest that you proceed with the section titled “Quick Start: Counting Parts by Quick Sample” near the end of this document. This will help familiarize you with the basic process. Then you can read the rest of this document to take advantage of some advanced features, and to increase overall accuracy.
QUICK START
QUICK SAMPLE BY PRESET NUMBER OF PIECES
- Count out 10 pieces of the part that you wish to count by hand.
- Press the SAMPLE key (the LEFT ARROW key). The quick sample screen will pop up.
- Press the ENTER key to accept a ten-piece sample.
- Place the ten pieces on the platform. Give it a second to stabilize and then press the ENTER key. The scale will calculate the piece weight and then switch to the counting screen.
- Remove the parts from the platform and then press the ZERO key.
- You are now ready to count. Place some parts on the platform and the count will be shown on the screen.
You may continue to count this part as long as you like. It will retain this sample until either the scale is powered down or you acquire a new sample.
QUICK SAMPLE BY SAMPLE WEIGHT
This is a new feature available in all Counting Scales equipped with the MKE-5 Digital Indicator. If you know the weight of your sample, you can immediately define a sample in 3 button presses. Please know the weight of your sample and the number of pieces in your sample.
- Press the SAMPLE key to bring up the SAMPLE VALUE screen.
- Enter the number of pieces in the sample currently on the platform.
- Press ENTER to confirm. You are now ready to count parts.
For this to work, the SAMPLE key (or FOUR Key) needs to be re-assigned. Please follow instructions in Assigning Quick Sample Button function to enable this feature.
DEFINING & USING SAMPLES WITH A 10-PIECE SAMPLE
Follow the steps below to quickly define, store and use parts in memory.
- Press the MENU button to bring up the main menu.
- Select PARTS COUNTING and press ENTER.
- Using the LEFT and RIGHT ARROW keys, select NEW in the lower menu and then press ENTER. A new part will be added to the list.
- Use the UP and DOWN arrow keys to line up on the new part. Use the LEFT and RIGHT arrow keys to select EDIT in the lower menu. Press ENTER to load the new part into the editor.
- Use the LEFT and RIGHT arrow keys and select ACQU in the lower menu. Press ENTER.
- The scale will ask you how many pieces you would like to use for this sample. Using the keyboard, enter 10 and then press ENTER.
- Remove all weight from the platform, then press ENTER.
- Place ten parts in the center of the platform. Press ENTER.
- The actual piece weight is calculated and shown on the display next to “Value:”. Press the MENU key to exit the editor. You will be taken back to the Samples List.
- To activate this new sample, use the UP and DOWN arrow keys to line up on it. Make sure that ACTV is highlighted in the lower menu. If not, use the LEFT and RIGHT arrow keys to select ACTV.
- Press ENTER to activate the sample. You will be taken to the counting screen. The top lines of the display will show the description and value of the sample.
- Remove all weight from the platform. Press ZERO.
- Place your parts on the platform and the count will be shown on the display.
PARTS COUNTING: OVERVIEW
Your scale has extensive parts counting capabilities. All of these capabilities will be outlined in this document. Parts counting is basically a four-step process. First you must acquire a sample of the pieces being counted so that the scale can calculate the weight of each piece. Then, the new sample needs to be activated. Next, the platform is zeroed and then you can count the parts.
Again, these steps are:
- Acquire the sample
- Activate the sample
- Zero the platform
- Count the parts
In normal operation, you may choose to use either Quick Sample Counting, or save the sample permanently in memory. Quick Sampling only takes a few keystrokes. It acquires a sample, activates it, and switches you into counting mode automatically.
For higher flexibility and accuracy, you can define a sample and store it permanently in memory. This process is suggested if you have a number different parts that you count repeatedly.
There are a few advantages to saving parts in memory:
- This is ideal for hardware manufacturers and the like because up to 480 different parts may be saved in memory along with their descriptions and piece weight.
- The part needs only to be sampled one time, not every time you go to count the part.
- Parts can be given a 14-character description and saved in a list.
- You can easily activate a part by selecting it from the list.
- Any sample size may be used while acquiring the sample. You are not restricted to 10, 25, 50 and 100 pieces as in Quick Sampling.
- Higher sample sizes increase counting accuracy.
- The part’s description will be shown on the display while counting.
- If your scale has an RS232 option, the part’s description may be printed on tags and labels, or transmitted to a computer.
CONTROLS AND INDICATORS
THE COUNTING SCREENS

This is the counting screen. You will be taken here automatically whenever you activate a sample. If not, you can get there by:
- Press the MENU key to bring up the main menu.
- The first option, NEXT SCREEN, is already highlighted. Press ENTER to accept it.
- The display will switch to the next screen in sequence. If you still don’t have the counting screen just repeat this process
one or more times. There are at least four screens associated with counting scales.
Sample and Value are the description and piece weight of the currently active sample. If there is no entry there, then there is no sample activated. Quick samples are indicated by the text “Taken from keyboard” on the sample line.
To clear any sample, press and hold the SAMPLE key until it clears.
FRONT PANEL / KEYBOARD
The front panel has a twelve button, click touch key panel that allows easy menu navigation as well as full text and floating-point entry.
The main scale functions are shown in black, menu navigation and floating point numeric entry keys are blue and the secondary functions are yellow.
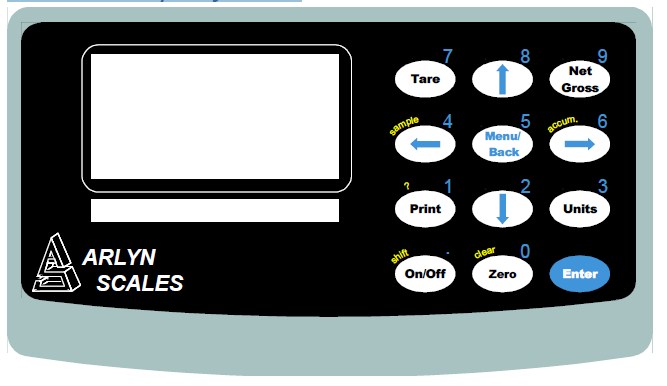
Besides navigating the menus and entering floating point numbers, the only two keys that pertain to counting and are two keys labeled in yellow.
SAMPLE: This key is used to acquire a quick sample. If you press and hold this key for a few seconds it will clear the active sample.
ACCUM: This key is used to accumulate totals for parts being counted. If you press and hold this key for a few seconds it will clear the accumulated total.
QUICK SAMPLE
QUICK SAMPLE BY PRESET NUMBER OF PIECES
This is a slightly more detailed description of Quick Sample Counting than that given in the Quick Start section above. This function is a quick method of acquiring a sample and activating counting mode at the same time. The sample size is limited to 10, 25, 50 or 100 pieces. Quick sampling should be used in cases where a very high degree of accuracy is not required.
The procedure for acquiring a quick sample is as follows:
- Decide on a sample size, either 10, 25, 50 or 100 pieces. The higher the sample size, the more accurate the counting will be. Count these parts out by hand.
- Press the SAMPLE (LEFT ARROW) key to enter the quick sample screen.
- Press the SAMPLE (LEFT ARROW) key until the desired sample size is displayed on the screen. The screen will cycle through 10,25, 50 and 100-piece sample sizes. Once you have the desired sample size on the screen, press ENTER to accept it.
- You may choose to use a box or other type of container to help manage the parts. Remove all weight (or place an empty box) on the platform. Press the ENTER key to accept it.
- Place the parts on the platform (or in the box). Its weight will be shown on the display. Press ENTER to accept this. The piece weight is calculated and the counting screen will be activated.
- Remove all weight from the platform, or place an empty container on the platform. Press the ZERO key.
- You can now count parts by placing them on the platform, or into the empty container.
- This sample will remain active until either the power is removed from the scale or a new sample is activated.
ASSIGNING QUICK SAMPLE BUTTON FUNCTION
The SAMPLE (or FOUR) key on the Front Panel of the Display Indicator can be used in two ways:
a) Quick Sampling by using a preset number of pieces (no need for knowing the weight of the sample)
b) Quick Sampling by using the number of pieces currently on the platform.
Method (a) is available as a factory setting. To switch to method (b), do the following steps.
- Press the MENU button.
- Go to Parts Counting and press ENTER.
- In the resulting screen, select “Sample Button Func” and press ENTER.
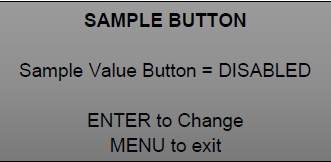
Press ENTER key to enable or disable the Sample Value function. Now press MENU/BACK until you are back on the main weight screen. Press the SAMPLE button again to test the feature. See the Quick Sample by Sample Weight feature explained in this manual.
WORKING WITH SAMPLES IN MEMORY
A more accurate and convenient way to sample parts is to define and store them in memory. You may define as many samples as you like within the scale’s memory capacity. Your scale has over 480 memory slots for saving samples and other data. Counting samples require one memory slot each.
Once you have a list of samples saved in memory, you may activate any one you like, zero the platform and begin counting. These samples remain permanently in memory even when the power is removed.
There are a number of functions used when working with samples in memory. There are:
- Creating a new, default sample.
- Editing its value (piece weight).
- Changing its description.
- Activating it.
- Deleting unneeded samples.
CREATING A NEW, DEFAULT SAMPLE
To create and save a sample in memory, use the following procedure:
- Press the MENU key to enter the scale’s Setup Menu.
- Use the arrow keys to line up on PARTS COUNTING and then press the ENTER key to select it.
- You will be shown a list of all samples that are currently saved in memory. If there are none then “None Defined” will be shown.
- To add a new sample to the list, use the RIGHT ARROW key to line up on NEW in the lower menu. Press the ENTER key. A new sample will be added to the list. Its description will be given a default value of “SAMPLE #XXX” where XXX is the next number in sequence.
The NEW function will only create the new sample. It will not assign it any values.
EDITING ITS VALUE (PIECE WEIGHT)
There are two ways to do this. You can enter the piece weight directly or you can have the scale automatically calculate it for you.
Enter its Piece Weight Directly
If you know the exact weight of the piece you may enter it directly.
Select the sample from the Sample List and load it into the editor.
- Using the LEFT and RIGHT arrow keys, line up on VALUE in the lower menu. Press ENTER.
- A small “?” will be placed next to Value on the screen. Type in the value through the front panel and then press ENTER.
- The new value will be shown on the screen. Press MENU to exit back to the Samples List.
*Note: Inputting piece weights directly may decrease the accuracy of counts on the screen. It is recommended whenever possible to ACQUIRE weights instead.
Acquire the Piece Weight Automatically from the Platform
Using pre-counted sample, you can have the scale automatically calculate the piece weight for you.
- Decide on the number of parts you would like to use for a sample. Count them out on the table in front of you.
- Select a sample from the Samples List and load it into the editor.
- Using the RIGHT and LEFT arrow keys select ACQU in the lower menu. Press ENTER.
- You will be asked how many pieces you are using in this sample. Enter the number through the keyboard and then press ENTER.
- Remove all weight from the scale (or place an empty box on the scale) and then press ENTER.
- Place the sample parts on to the platform (or in the box) and then press ENTER.
- The piece weight will be calculated and shown on the display. Press MENU to exit back to the Samples List.
CHANGING ITS DESCRIPTION
Samples retained in memory carry 14-character descriptions that you may change to anything you wish. The advantage of naming these samples is obvious, especially if you have a large number of samples in your list. Additional advantages are that the sample’s description and its value are shown on the top two lines of the counting display, and if you are using our RS232 port to print labels you can include the description on the label as well.
By default, when you first create a sample it is given the description “Sample #XXX” where XXX is the next number in sequence. If you wish to change the description, follow the procedure below.
- Press MENU to bring up the Setup Menu.
- Use the ARROW keys to select Parts Counting and then press ENTER. You will be taken to a list of all samples currently saved in memory along with their descriptions.
- Use the UP and DOWN ARROW keys to line up on the sample that you wish to edit. Use the LEFT and RIGHT ARROW keys to select EDIT in the lower menu. Press ENTER to load the sample into the editor. The description and value (piece weight) will be shown on the editor screen.
- Use the LEFT and RIGHT ARROW keys to select DESC in the lower menu. It may already be selected by default. Press ENTER.
The description will be loaded into the text editor.
Text Editor Screen
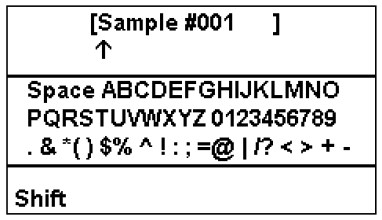
The current description is shown at the top of the screen with an arrow pointing at the first character. This arrow is your cursor position.
Editing the description is similar to techniques commonly seen in video games, cell phones and the like. By using the ARROW keys you can select any character from the set. Press ENTER to replace the character above the arrow with the character selected from the set. When you do this, the arrow (cursor position) will automatically advance to the next character.
When you are done editing, Press the MENU key to leave this screen.
The keys used for the editing are shown below.
| ARROW KEYS | Use them to select a character from the set in the lower list. |
| 7 and 9 KEYS | Use these to position the arrow (cursor position) on the top line. |
| ENTER KEY | Changes the character above the arrow to the character selected and advances the arrow to the next position. |
| CLEAR KEY | This will clear the entire line and place the arrow in the leftmost position. |
| MENU KEY | This will end the operation and exit the text editor screen. |
| SHIFT KEY | Selects either upper case or lower-case characters. |
ACTIVATING A SAVED SAMPLE
In order to begin parts counting you need to activate one of the saved samples using the following procedure:
- Press MENU to enter the System Menu.
- Use the arrow keys to select PARTS COUNTING and then press ENTER to accept it.
- Use the arrow keys to line up on the desired sample. Use the LEFT and RIGHT arrow key to select ACTV in the lower menu (it may already be selected). Press the ENTER key. The sample will be activated and the scale will switch to the parts counting screen. Its description and value will be shown on top of the screen.
- Remove all weight from the platform (or place an empty box on the platform). Press the ZERO key.
- You may now place an unknown quantity of the parts on the platform, or into the box if you used one, and the count will be shown on the screen.
DELETING UNNEEDED SAMPLES
To delete an unneeded sample from the Samples List:
- Line up on the desired sample in the Samples List.
- Using the RIGHT and LEFT arrow keys select DEL in the lower menu.
- Press ENTER to delete the sample.
TIPS AND RULES FOR ACQUIRING SAMPLE
Before a part can be counted, the scale needs to know how much each piece weighs. This process is known as Sample Acquisition. Samples can be taken quickly.
Acquiring an accurate sample is essential for parts counting and there are a few basic rules that should be followed.
- The parts being counted must be the same weight from piece to piece. The scale calculates the number of parts on the platform by simply reading the total weight and dividing it by the weight of each piece. If there were variations in weight from one part to another it would be impossible to make an accurate calculation.
- A single part must be heavy enough to be detectable by the scale. Parts counting scales come in all capacities. The smaller capacity scales (10 and 25lb capacities) usually have no trouble detecting a light weight, single piece. That same piece would be undetectable on larger scales, say 50lb capacities or greater. The general rule is that the minimum piece weight must be greater than or equal to the scale’s displayed resolution. You may go down as low as one half the scale’s resolution if you take accurate (high number) samples and your parts are of a consistent weight from piece to piece. Consult the section titled “Minimum Piece Weights” for exact values for each capacity.
- The scale must be sitting on a stable surface. If the scale is sitting on a surface that is either vibrating, located in a drafty area, or in any area that causes the scale to be unstable, it will not count accurately. This is especially true when acquiring samples.
- The scale must be accurately calibrated if you are using samples stored in memory. If you are using a sample that was previously saved in memory, the scale must be accurately calibrated. This is due to the fact that when a sample is saved in memory, its piece weight (value) in pounds is saved with it. When this sample is activated on an uncalibrated scale, the count will not be correct. This does not apply to a quick sample because the quick sample function calculates the piece weight using the scale’s current calibration, even if incorrect.
INCREASING ACCURACY
In general, the more pieces that you use while acquiring a sample, the more accurate the parts counting will be. If you use a small sample, let’s say 50 pieces or less, you may experience errors that will increase as larger loads are applied to the scale.
The most ideal way to acquire a sample is to use a sample size near the expected number of parts that you count regularly. For example, if you are counting 1000 #6 washers into each box, then acquire your sample using a 1000-piece sample size.
Quick sampling is limited to sample sizes of 10, 25, 50 or 100 pieces, and its accuracy is limited. It is recommended to use quick sampling only for counting heavy pieces or in situations where absolute accuracy isn’t needed.
A far better way to acquire the sample is to store it in memory. When defining samples to be saved in memory any sample size may be used. Consult the section titled “Saving Samples in Memory” for details.
ACCUMULATING TOTALS
Your scale has the capability of keeping running totals. While in the counting screen, press the ACCUM (RIGHT ARROW) key. It will add the current number of parts on the platform into its accumulate register. The icon on the screen will change from PCS to PCS ACC. The count displayed will be the number of parts in the accumulate register PLUS any parts that may be on the platform. Successive presses of the ACCUM key will continue to add parts to the accumulate register.
To clear the accumulate register, press and hold the ACCUM key until the register clears and the display returns to normal.
MULTIPLE PLATFORM COUNTING
Some scales are equipped with two or more platforms. In most cases there is a small capacity platform and a large capacity platform. Samples can be taken, or parts counted, on either platform.
It is always recommended to acquire samples on the small capacity platform, if possible, to get the maximum accuracy. But you may use either one.
You may also count parts on either platform, but for maximum accuracy it is recommended that you count on the small capacity platform. If your total weight exceeds the capability of the small platform then move the counting to the large one.
Use the DOWN ARROW key to switch platforms. Once a sample is activated, remember to press ZERO to zero the scale or empty box prior to counting.
When editing Samples, you are also given the option of selecting which platform the sample will apply to. Select the right platform where you want the parts counting to apply and when the sample is activated, the sample will only apply to that platform.
TIPS TROUBLESHOOTING
If you aren’t getting the results you are expecting, please consult the list below for a possible remedy. If you are still having difficulties, please contact Arlyn’s Customer Service Department.
The indicated parts count is unstable or drifting
- The weight of the piece you are trying to count is below the scale’s capability. Consult the section titled “Minimum Piece Weights” for details.
- The scale is on a vibrating, or otherwise non-stable surface.
- The reading is being affected by an external force. Common examples are a draft, something mechanical rubbing against the platform, high levels of static electricity, or RF radiation emitted by portable or cell phones or some other sort of transmitter nearby.
The count is not accurate
- You didn’t press the ZERO key on an empty platform just prior to counting (most common).
- The weight of the piece you are trying to count is below the scale’s capability. Consult the section titled “Minimum Piece Weights” for details.
- You may need to acquire a better sample by using a larger sample size. This is especially true if counting a large number of parts.
The piece count display is stuck on zero
- You didn’t press the ZERO key on an empty platform just prior to counting (most common).
- There is no sample activated.
- For saved samples, the value may not have been entered (set at 0.00lb). Go back and acquire the value. You can see the sample’s description and value on top of the count display.
I can’t seem to find the parts counting screen
This screen should pop up automatically upon activating a sample. If it doesn’t, press MENU to bring up the Setup Menu and then select the option for Next Screen. This will bring you to the next screen in sequence. You may have to do this a couple of times because counting scales have four screens.
There are no entries for parts counting in any menu
Your counting mode may not be enabled. In addition to the additional circuitry required for counting scales there is a software switch that must be enabled. It may have been shut down by accident while working with a technician over the phone or was accidentally switched off during recent service at our factory. Call our service department with your serial number and we will enable it for you.
MINIMUM PIECE WEIGHTS
The parts you are trying to count must be heavy enough to be detectable by the scale.
The minimum piece weight is recommended to be 4 times greater than the scale’s displayed resolution. The piece weight can go down to as low as being equal to the scale resolution if you take accurate (large sample size) samples and your parts are of a consistent weight from piece to piece. If the regular scales do not fit your minimum piece weight requirements, you can opt for the ultra-high precision SAW Scales that can accommodate high capacities with ultra-high resolution (readability of 1:100000 compared to 1:5000 in regular scales).
If you find your piece weight to be lower than the scale resolution, the scale will work for you if you are consistently counting the same number of pieces for the same sample every time. You cannot use Quick Sampling. You must use the Sample Definition Acquire method using a sample size that you will always be counting and store the value. So, if you always need to count 1000 steel washers every single time, make sure to acquire and store the piece weight based on 1000 steel washers using the Sample Memory Feature.
An easy way to determine the weight of your part is to count 100 of them by hand and then weight them on the scale. Take that weight and divide it by 100. Multiply that result by 4. This will give you the recommended minimum piece weight.
Below is a table of current models with their capacity and displayed resolution.
| Model | Capacity (lb) | Resolution | Recommended Min. Piece Weight |
| 820-V | 5 | .001 lb / .0005 kg | .004 lb / .002 kg |
| 820-X | 10 | .002 lb / .001 kg | .008 lb / .001 kg |
| 820-T | 25 | .005 lb / .002 | .02 lb / .008 kg |
| 820-L | 50 | .01 lb / .005 kg | .04 lb / .02 kg |
| 820-C | 100 | .02 lb / .01 kg | .08 lb / .04 kg |
| 320-D | 500 | .1 lb / .05 kg | .4 lb / .2 kg |
| 320-M | 1000 | .2 lb / .1 kg | .8 lb / .4 kg |
| 5400 Series | 2500 | .5 lb / .2 kg | 2 lb / .8 kg |
| 5000 | 1 lb / .5 kg | 4 lb / 2 kg | |
| 10000 | 2 lb / 1 kg | 8 lb / 4 kg | |
| 20000 | 5 lb / 2 kg | 20 lb / 8 kg | |
| SAW-X | 10 | .0001 lb / .00005 kg | .0004 lb / .0002 kg |
| SAW-T | 25 | .0002 lb / .0001 kg | .0008 lb / .0004 kg |
| SAW-L | 50 | .0005 lb / .0002 kg | .002 lb / .0008 kg |
| SAW-C | 100 | .001 lb / .0005 kg | .004 lb / .002 kg |
| SAW-H | 200 | .002 lb / .001 kg | .008 lb / .004 kg |
| SAW-JL | 300 | .005 lb / .002 kg | .02 lb / .008 kg |
| SAW-KL | 500 | .01 lb / .005 kg | .04 lb / .02 kg |
| SAW-MXL | 1000 | .02 lb / .01 kg | .08 lb / .04 kg |
GLOSSARY
Accumulate Function: Is used to maintain a running total of counts.
Capacity: The maximum weight, in pounds, that the scale platform is designed to handle during normal use.
Minimum Piece Weight: Is the lightest piece weight that is detectable by the scale.
Piece Weight: This is the actual weight, in pounds, of a single piece. Also called Value.
Resolution: The minimum weight increment that is discernable on the display.
Sample Size: This is the number of pieces that you will use to acquire a sample on the scale. Once the scale knows the sample size it
can calculate the piece weight by taking the total weight and dividing it by the sample size.
Value: Same as piece weight, the actual weight of each piece in pounds.
REVISION
Arlyn MKE-5 Digital Indicator – Series 8200 – Parts Counting Manual
59 Second Street
East Rockaway, NY 11518
(800) 645-4301
www.arlynscales.com
v3.0.101420
